Manually installing a YajHFC fax printer with CUPS
Starting with YajHFC 0.4.3, there are three different ways to install a fax printer with YajHFC in Linux/Unix using CUPS:
-
Using YajHFC's TCP printer port together with CUPS'
socket: backend
-
Using YajHFC's named pipe printer port with a custom CUPS backend
-
Using a custom CUPS backend that starts YajHFC in the backend
The individual advantages/disadvantages of the different methods are:
|
Method
|
Advantages
|
Disadvantages
|
|
TCP port with socket: backend
|
-
CUPS is used as designed
-
Relatively easy to set up
-
No custom CUPS backend necessary
|
-
YajHFC must be running for the fax printer to work
-
Only a single user per computer can be logged in and have a working fax printer
-
Any print output on the fax printer goes to the user that has YajHFC started
|
|
Named pipe with custom backend
|
-
CUPS is used as designed
-
Relatively easy to set up
-
Works for multiple users simultaneously logged in on the same computer
|
-
YajHFC must be running for the fax printer to work
-
Needs a custom CUPS backend
|
|
Custom backend starting YajHFC
|
-
YajHFC does not need to be running for the fax printer to work
-
Works for multiple users simultaneously logged in on the same computer
|
-
Needs a custom CUPS backend
-
The CUPS backend is used in a way a backend actually is not intended to be used
-
Often a bit tricky to set up
|
The recommended method is the second one (using named pipes), as this method works flawlessly on a multi-user system and is not too hard to set up. This method is also used by the yajhfc-faxprinter package. (Nevertheless, you are also encouraged to use the other ones if they better fit your needs).
This document only describes the first two methods. If you want to try the third one, please download the yajhfc-cups2.tgz tar archive and refer to the included INSTALL file.
Using YajHFC's TCP printer port together with CUPS' socket: backend
NOTE: You can also get all the files mentioned in this document (including this HTML file) by downloading this archive. This is especially recommended if you need to download the files using a Windows computer (as this may screw up the line breaks).
Setting up YajHFC
-
Start YajHFC, open the Options dialog, go to Advanced -> Printer Port and enable the TCP printer port as shown in the following image (you can just accept the defaults):
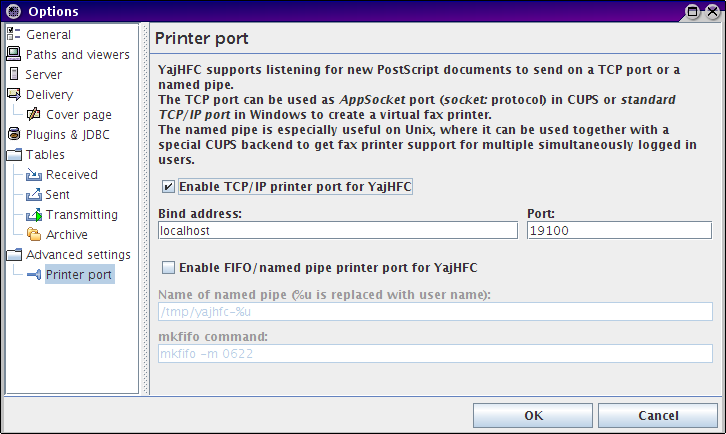
-
Close the Options dialog clicking OK
-
Make sure YajHFC is automatically started when the user logs in.
If you use a desktop environment following the Free Desktop Menu Specification (e.g. GNOME, KDE, XFCE), just create an appropriate .desktop file and put it in the directory ~/.config/autostart (to autostart it for a single user only) or /etc/xdg/autostart (to autostart it for all users).
If you wish, you can use yajhfc-autostart.desktop as a starting point.
If you use a different desktop environment, please refer to its documentation (or Google) to find out how to autostart programs.
Setting up CUPS
-
Download
yajhfc.ppd and save it on your hard disk.
-
Open a terminal and change to the directory where
yajhfc.ppd is:
cd /directory/to/yajhfc.ppd/
-
Enter (or copy&paste) the following command into one line in the terminal (as root, so prefix the command with sudo if necessary):
 lpadmin -p yajhfc -D 'YajHFC virtual fax printer' -L 'localhost' -v 'socket://localhost:19100'
      -E -P yajhfc.ppd -o "printer-error-policy=abort-job" -o "printer-is-shared=false"
If you want to know in detail what this command means, please refer to the lpadmin man page.
-
Now you should have a new printer named
yajhfc available. When you print to it and YajHFC is running, the YajHFC send dialog should appear (maybe after a delay of a few seconds).
Using YajHFC's named pipe printer port with a custom CUPS backend
NOTE: You can also get all the files mentioned in this document (including this HTML file) by downloading this archive. This is especially recommended if you need to download the files using a Windows computer (as this may screw up the line breaks).
Setting up YajHFC
-
Start YajHFC, open the Options dialog, go to Advanced -> Printer Port and enable the named pipe printer port as shown in the following image (you can just accept the defaults):

-
Close the Options dialog clicking OK
-
Make sure YajHFC is automatically started when the user logs in.
If you use a desktop environment following the Free Desktop Menu Specification (e.g. GNOME, KDE, XFCE), just create an appropriate .desktop file and put it in the directory ~/.config/autostart (to autostart it for a single user only) or /etc/xdg/autostart (to autostart it for all users).
If you wish, you can use yajhfc-autostart.desktop as a starting point.
If you use a different desktop environment, please refer to its documentation (or Google) to find out how to autostart programs.
Setting up CUPS
-
Download
yajhfc.ppd and the CUPS backend file yajhfc and save it on your hard disk.
-
Open a terminal and change to the directory where
yajhfc.ppd and yajhfc are:
cd /directory/to/yajhfc.ppd/
-
Install the CUPS backend. To do so, enter the following commands in the terminal (as root, so prefix the commands with sudo if necessary):
 cp yajhfc /usr/lib/cups/backend

 chown root /usr/lib/cups/backend/yajhfc

 chmod 0755 /usr/lib/cups/backend/yajhfc
On some distributions the cups backend directory may be at another place than /usr/lib/cups/backend. In that case, just replace /usr/lib/cups/backend with the appropriate directory name.
-
Enter (or copy&paste) the following command into one line in the terminal (as root, so prefix the command with sudo if necessary):
 lpadmin -p yajhfc -D 'YajHFC virtual fax printer' -L 'localhost' -v 'yajhfc:/tmp/yajhfc-$USERNAME'
      -E -P yajhfc.ppd -o "printer-error-policy=abort-job" -o "printer-is-shared=false"
If you want to know in detail what this command means, please refer to the lpadmin man page.
-
Now you should have a new printer named
yajhfc available. When you print to it and YajHFC is running, the YajHFC send dialog should appear.
Created by: Jonas Wolz
Last modification:
Monday, 12-Dec-2016 11:52:09 CET